The SearchStax Help Center Frequently Asked Questions page includes FAQs about SearchStax Managed Search, our hosted Apache Solr Cloud service.
The SearchStax Managed Search service is a fully-managed hosted Solr SaaS solution that automates, manages and scales Solr infrastructure.
When Solr logs show “unknown field” errors, it means that you are sending documents to Solr that do not match the Solr schema. Documents with unknown fields cannot be added to the index, which has obvious drawbacks for your project. For more information, see What Causes Indexing Errors? To remedy this situation, you’ll have to update the schema.
How should you update the Solr schema? There are several ways.
Updating the Solr schema(s) from Sitecore XP is extremely simple, but there is one pitfall to avoid.
The above procedure (“select all indexes”) assumes that you used the SearchStax Cloud Connector for Sitecore to set up the deployment. The connector configures each collection to have its own schema. In that configuration, you can refresh all of the collections at the same time.
If you manually configured the collections to all use the same schema, however, you cannot regenerate all collections in one step. You must regenerate them one at a time. See Why does Sitecore fail to populate schemas?
If you run into any difficulty making the updates, see Sitecore Connection Errors for a list of common Sitecore/Solr issues.
Many users have asked how to manually update the Solr schema file in their deployments. Solr documentation recommends using the Solr Schema API to update the schema, but many Solr users find it burdensome and unintuitive. They prefer to edit the managedschema file locally in a text editor and then upload it. The two approaches both work, as long as you don’t mix them.
The following procedure uses the edit-locally-and-upload strategy. The critical part is that changes to field definitions invalidate the collection’s index. The index must be wiped and the documents reloaded as part of a schema update. The process occurs in four steps.
The examples below rely on zkcli, the Zookeeper upload/download utility. This is appropriate to your initial experiments, but it is not the best way to interact with Zookeeper.
For truly secure Zookeeper management, use the SearchStax API. The API’s Zookeeper methods require SearchStax user authentication, and they record entries in the SearchStax access logs. Even better, they are not affected by changes in IP addresses.
If you don’t have a copy of your Solr configuration, you can download one.
Edit your schema.xml or managed-schema file in a text editor. Be sure to save it in your local copy of your project-configuration directory.
When you are ready to deploy your new schema file, simply use zkcli to upload your configuration directory to your Zookeeper ensemble. (See zkcli download instructions.)
Run zkcli in a terminal window:
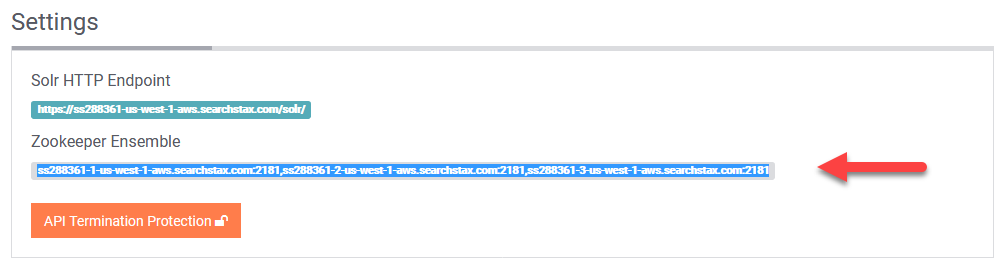
./zkcli.sh -zkhost -cmd upconfig -confdir -confnamewhere corresponds to the URLs of the Zookeeper servers in the deployment details page:
is you local Solr configuration directory ( ../configsets/basic_configs/conf/ or ../configsets/_default/conf/ ); and is the name of the configuration in Zookeeper ( test ).
To delete the data that was loaded under the previous schema, see How to Empty a Solr Index.
The next step is to download the new configuration from the Zookeeper ensemble to the Solr servers.
curl 'https://solr/admin/collections?action=RELOAD&name='
where is the Solr HTTP Endpoint URL from the SearchStax dashboard, and is the name of the Solr collection ( testcollection ).
Note that you can perform this step directly from the Solr Dashboard.

We presume that you already know how to ingest documents, but here’s a reminder:
Run the following cURL command from a terminal window.
curl -X POST -H 'Content-type:application/json' -d 'https:///solr//update?commit=true'
where is the Solr HTTP Endpoint URL from the deployment details page, is the location of the document file ( @sample.json ), and is the name of the Solr collection ( testcollection ).
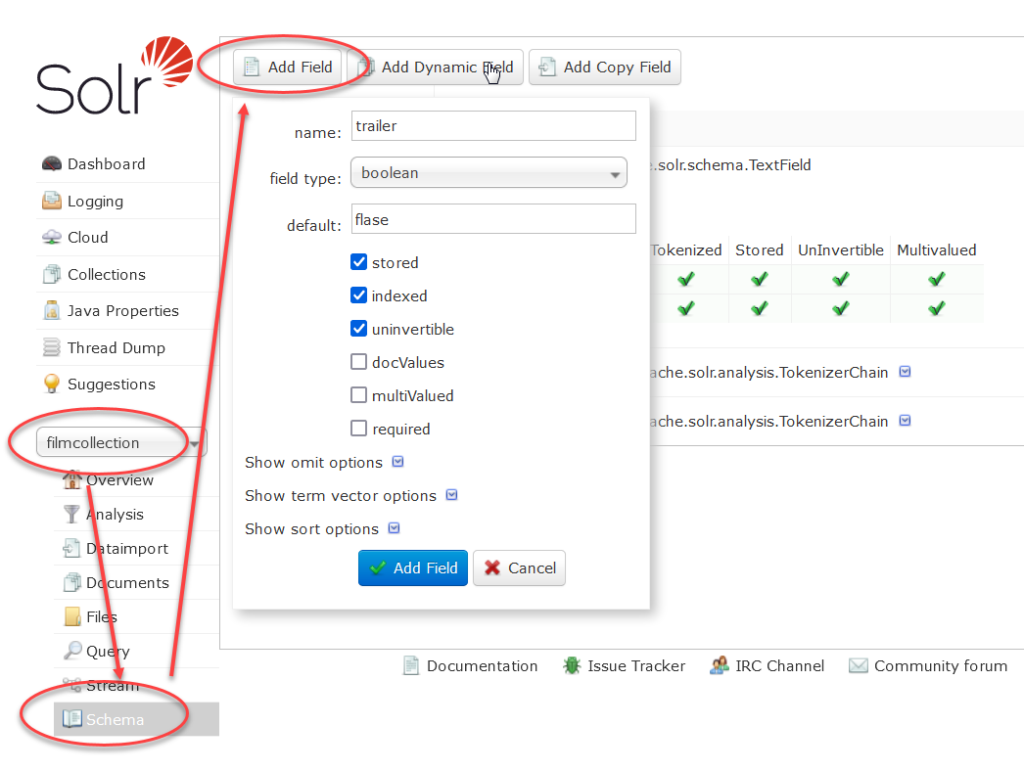
The Solr Dashboard offers a limited ability to view and update the managed-schema field definitions directly. These tools are often sufficient to debug and fix a schema problem.
From the top level Solr Dashboard, select the collection and then scroll down to the bottom of the resulting options. The Schema node lets you examine fields and their contents. Click the Add Field button. Enter the properties of a missing or unknown field and save it.
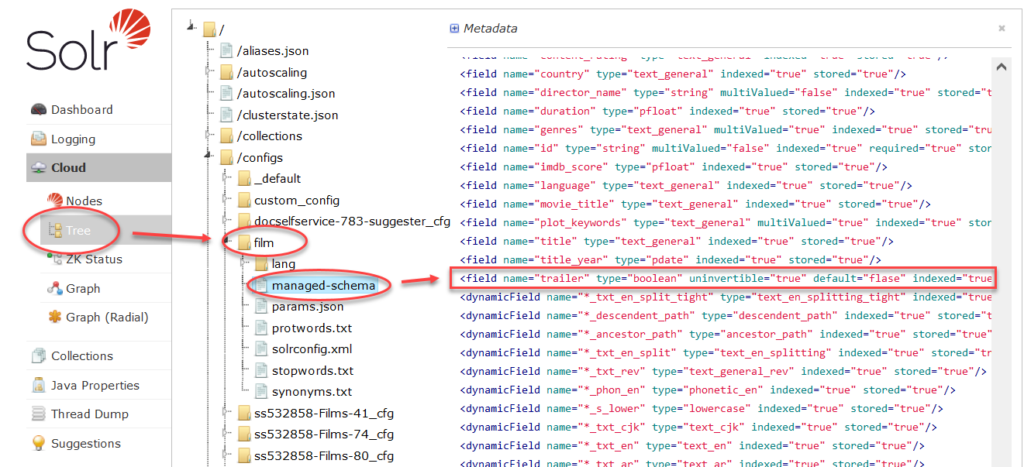
You can then verify that the new field has appeared in the managed-schema file. Open the Cloud/Tree node to the appropriate configset. Select managed-schema and scroll down to the list of fields. Locate the new field.
Note that you’ll need to go through the usual series of steps to wipe the content of the index, “reload” the altered config to the Solr nodes, reload the data to the index, and commit it.
Do not hesitate to contact the SearchStax Support Desk.